How to Set Up Shipping Zones (Zone-Based Shipping)
Create Shipping Rates by Shipping Class and Zone
A
Shipping Zone is a geographical area to which you ship items. You can get as specific as you need, right down to regions and zip codes, or you can leave it more general – whichever suits you best.
Customers only see the methods available for their address and corresponding zone.
Each customer matches only one zone.
For example:
-
In the 90210 zip code in California, I offer Local Pickup and Free Shipping.
-
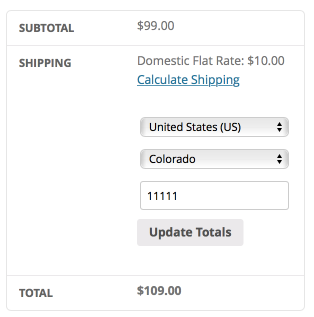
In the United States, I offer a Domestic Flat Rate.
-
In Canada and U.S. regions, I offer a different Flat Rate.
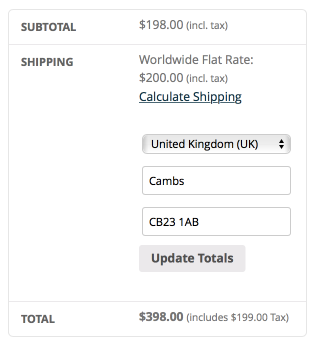
This is what your customers would see if they use the Calculate Shipping option:
| CALIFORNIAN CUSTOMER |
NON-CALIFORNIAN, U.S. CUSTOMER |
INTERNATIONAL CUSTOMER |
|---|---|---|
 |
 |
 |
- Hover over your zone of choice and select Edit.
- Select the States covered in your zone. Or restrict by zip code. In this example, all states are covered under United States (Non-Taxable) expect for California. If there are other states that incur tax on shipping, you can use the United States (Taxable) zone and select the states that apply there.
- Select Add Shipping Method to create Flat Rate, Free Shipping, or Local Pickup. Read below for details regarding each shipping method.
Local Pickup:
Customers can pick up their items for a designated location.
- Hover over Local Pickup and select Edit.
- Enter a Title that displays to customers during checkout. For example, "Local Delivery".
- Enter Cost.
- Enter Tax Status.
- Enter Description.
- Select Save Settings.
Free Shipping:
Free shipping is a great way to incentivize customers.
-
- Hover over Free Shipping and select Edit.
- Edit a shipping Title that displays to customer during checkout. For example "Free Shipping on $100+".
- Enter the minimum order dollar ($) amount (if applicable). For example, if you want the customer to spend $100 before getting free shipping, type in 100.
- Click Save Settings.
- Hover over Free Shipping and select Edit.
-
Flat Rate: You can further customize flat rate shipping by assigning conditional rates to classes. Shipping classes are available for the Flat Rate method only.
- Hover over Local Pickup and select Edit.
- Edit a shipping Title that displays to customer during checkout. For example "Flat Rate Shipping (3-5 Business Days)".
- Enter Cost.
- Enter Description.
- To group a particular set of products ts for separate shipping price, enter the Shipping Class Cost.
The Cost field allows you to charge a flat rate per item, a percentage based cost or a minimum fee.
Available placeholders:
- [qty] – Number of products in the cart
- [fee] – An additional fee. This fee has two optional arguments.
- percent – A percentage based on total order cost.
- min_fee – A minimum amount. Useful when using percentages.
- max_fee – A maximum amount. Useful when using percentages.
- Examples:
10 + ( 2 * [qty] )– A base shipping cost of $10 plus $2 for each item in the cart.20 + [fee percent="10" min_fee="4"]– A base shipping cost of $20 plus 10% of the order total, which is at least $4.Please note that shipping classes won't apply unless you specify them from Your Product Page. After specifying your shipping classes, read below to learn how to apply them to specific products.
Configuring Product-wise Shipping Class

Go to your Vendor Dashboard > select Products > select the product you want to add a shipping class to by hovering over the product name and select Edit
- Scroll down until you find the section that reads Shipping and Tax.
- Enable the checkbox "This Product Requires Shipping"
- Input weight, length, width, and height
- Select the shipping class you want to apply to this product from the dropdown
- Select the Tax Status and Tax Class
- Click Save Product
Note: Each product can only have one shipping class. If you are not sure which class to use, please email market@aestheticrecord.com with a detailed description of your shipping requirements